I just saw some of knockman's youtube videos on Matrix Synth:
https://www.matrixsynth.com/2019/04/yam ... nd-de.html
https://www.matrixsynth.com/2019/04/aci ... rumba.html
Subscribed! You're totally an influencer now!

Pictures of your builds!
-

- KVRAF
- 12352 posts since 7 May, 2006 from Southern California
-
 Stammwerk Audio Stammwerk Audio https://www.kvraudio.com/forum/memberlist.php?mode=viewprofile&u=434770
 - KVRist
- 31 posts since 31 Jan, 2019
Hi Hanglow, thanks for sharing this. Do you have a website with more maybe too? Would love to have a look 
Cheers
Cheers
_______________________________________
Stammwerk Audio
https://stammwerk-audio.com
https://www.facebook.com/stammwerkaudio
https://www.instagram.com/stammwerkaudio
https://www.youtube.com/channel/UCKqdQ5 ... pkyF6Ttu6g
Stammwerk Audio
https://stammwerk-audio.com
https://www.facebook.com/stammwerkaudio
https://www.instagram.com/stammwerkaudio
https://www.youtube.com/channel/UCKqdQ5 ... pkyF6Ttu6g
-

- Beware the Quoth
- 33144 posts since 4 Sep, 2001 from R'lyeh Oceanic Amusement Park and Funfair
Total John Foxx 'Metamatic' vibe on the second one...justin3am wrote: ↑Fri Apr 12, 2019 8:48 pm I just saw some of knockman's youtube videos on Matrix Synth:
https://www.matrixsynth.com/2019/04/yam ... nd-de.html
https://www.matrixsynth.com/2019/04/aci ... rumba.html
Subscribed! You're totally an influencer now!
my other modular synth is a bugbrand
-
- Banned
- 38 posts since 14 Nov, 2009
 - non-synced video (still learning video editing)
Pashkuli Keyboard
Last edited by adXok on Thu Aug 29, 2019 11:25 am, edited 1 time in total.
-
- addled muppet weed
- 105764 posts since 26 Jan, 2003 from through the looking glass
i have no idea how you play that!
but it is a thing of beauty.
the keybed is organic looking, has me in mind of cells in a beehive.
lovely stuff!
but it is a thing of beauty.
the keybed is organic looking, has me in mind of cells in a beehive.
lovely stuff!
-
- Banned
- 38 posts since 14 Nov, 2009
Thanks, really appreciate your opinion.
Any questions will be answered!
I am doing all on my own in my "shed" (bedroom actually).
If you look at the picture where my hand i s straight above the keys laying comfortable... the thumb and the pinky fingers span an "octave" interval - really comfortably and without any need for stretching. On top of that the rest of the fingers can play any notes in-between for any chords... even "impossible" ones; the ring finger is on a "minor third", the middle finger is on a "fifth" and the index finger is on a "minor seventh". Hence, if would have pressed on the keys, the resulting chord would have been (in that case)... standard name of Gmin7 with an "octave repeat" above of the root note G (the thumb).
I am still preparing the video demos.
-
- KVRAF
- 12352 posts since 7 May, 2006 from Southern California
An old work bench was left in the garage when we moved into our new place, so I've been putting it to good use.

I just finished building pairs of a few different 500 series modules.
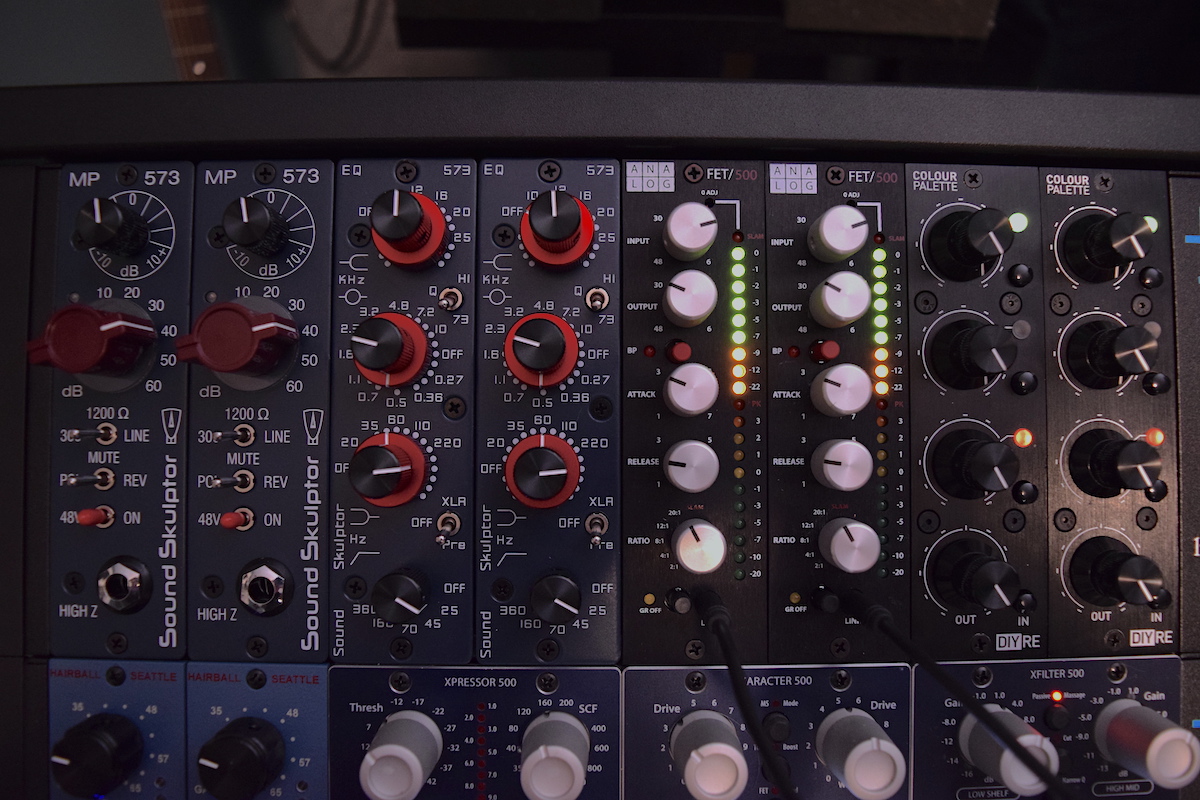
I'm afraid I didn't document the builds this time. But the process, for the most part, was very similar to the Lola pres I built before.
From left to right, there are a pair of Sound Skulptor MP573 and EQ573 modules (which are based on the Neve 1073 pre and EQ), a pair of Hairball FET/500 compressors (which are based on the 1176 rev. D) and a pair of DIY RE Color modules. Where my other 500 rack is a very clean and detailed stereo single path for bus processing, this rack is full of character, distortion and imprecision. Ideal for processing individual instruments during tracking. It will also FSU like nothing I have ever heard. Just insanely brutal at high gain.
For anyone looking to get into 500 series stuff, I would totally recommend starting with the DIYRE stuff. The kits are super easy to build and the Color sub-modules are pretty affordable. You can get a used Heritage Audio OST-4 case for <$250 USD (I use one of these for testing modules before they go in my API cases, good quality) and there are a number of different 500-series modules which are compatible with the Color format. I use two Color Palette modules which can each hold three Colors. There are a ton of different types of Colors, from tape simulators, to slap-back delays, tube saturators, even full compressors and EQs.
DIYRE have a preamp which also has a color slot, which I think is a good way to start. You need a good gain stage before the Color module, so you can really drive it. That's where most of the magic happens. I use the FET/500's high-gain output to drive my Color Palettes. Louder Than Liftoff and Bart HRK have their own lines of Color modules and also make pres and other modules with Color slots.
The Colors I'm currently using are:
2x GT Console (germanium transistor, wooly fuzz-like drive, darkish tone)
2x Soviet Pentode (NOS mini-tube with Pentode or Triode configurations, kinda lo-fi)
2x Mass Drivr (API-style discrete op-amp+transformer based line driver, subtle transformer
saturation)
I have a few others I can swap out:
Implode (1176 based compressor in a Color Module, heavy compression)
2x Tone-Loc (compressor based on Shure Level-Loc, lo-fi dynamic smasher)
British EQ (simple two band EQ, doesn't distort nicely but it's a nice set of shelf filters for shaping the output from other Colors)
Easy EQ Si (2-band passive EQ, this is more like a saturation module with tone sculpting controls)
Some of these have controls in the form of trim-pots and jumpers, on their PCBs. You kinda need a test jig like this one, in order to hear the changes you are making, so I prefer Colors which are set&forget type affairs.
The other modules I built were a bit more on the challenging side. The MP573s and FET/500 both require some calibration. If you have multi-meter and something which can generate a test-tone, you should be good. The Sound Skulpt and Hairball modules are very dense, in terms of part placement but the documentation from both of these companies, is outstanding. That said, surface mounting 21 thru-hole LEDs for each FET/500 and trying to get them all lined up with the front panel, was not fun! It was definitely worth the time. These modules sound fantastic and every single part is extremely high quality.
I just finished building pairs of a few different 500 series modules.
I'm afraid I didn't document the builds this time. But the process, for the most part, was very similar to the Lola pres I built before.
From left to right, there are a pair of Sound Skulptor MP573 and EQ573 modules (which are based on the Neve 1073 pre and EQ), a pair of Hairball FET/500 compressors (which are based on the 1176 rev. D) and a pair of DIY RE Color modules. Where my other 500 rack is a very clean and detailed stereo single path for bus processing, this rack is full of character, distortion and imprecision. Ideal for processing individual instruments during tracking. It will also FSU like nothing I have ever heard. Just insanely brutal at high gain.
For anyone looking to get into 500 series stuff, I would totally recommend starting with the DIYRE stuff. The kits are super easy to build and the Color sub-modules are pretty affordable. You can get a used Heritage Audio OST-4 case for <$250 USD (I use one of these for testing modules before they go in my API cases, good quality) and there are a number of different 500-series modules which are compatible with the Color format. I use two Color Palette modules which can each hold three Colors. There are a ton of different types of Colors, from tape simulators, to slap-back delays, tube saturators, even full compressors and EQs.
DIYRE have a preamp which also has a color slot, which I think is a good way to start. You need a good gain stage before the Color module, so you can really drive it. That's where most of the magic happens. I use the FET/500's high-gain output to drive my Color Palettes. Louder Than Liftoff and Bart HRK have their own lines of Color modules and also make pres and other modules with Color slots.
The Colors I'm currently using are:
2x GT Console (germanium transistor, wooly fuzz-like drive, darkish tone)
2x Soviet Pentode (NOS mini-tube with Pentode or Triode configurations, kinda lo-fi)
2x Mass Drivr (API-style discrete op-amp+transformer based line driver, subtle transformer
saturation)
I have a few others I can swap out:
Implode (1176 based compressor in a Color Module, heavy compression)
2x Tone-Loc (compressor based on Shure Level-Loc, lo-fi dynamic smasher)
British EQ (simple two band EQ, doesn't distort nicely but it's a nice set of shelf filters for shaping the output from other Colors)
Easy EQ Si (2-band passive EQ, this is more like a saturation module with tone sculpting controls)
Some of these have controls in the form of trim-pots and jumpers, on their PCBs. You kinda need a test jig like this one, in order to hear the changes you are making, so I prefer Colors which are set&forget type affairs.
The other modules I built were a bit more on the challenging side. The MP573s and FET/500 both require some calibration. If you have multi-meter and something which can generate a test-tone, you should be good. The Sound Skulpt and Hairball modules are very dense, in terms of part placement but the documentation from both of these companies, is outstanding. That said, surface mounting 21 thru-hole LEDs for each FET/500 and trying to get them all lined up with the front panel, was not fun! It was definitely worth the time. These modules sound fantastic and every single part is extremely high quality.
-
- KVRist
- 42 posts since 8 Sep, 2018
-
- KVRer
- 5 posts since 7 Sep, 2020
Recently built this DIY DJ Stand and it has worked great! https://www.youtube.com/watch?v=5oTOCGo584c
-
- KVRAF
- 12352 posts since 7 May, 2006 from Southern California
This was definitely one of the easiest pedal mods I've done.
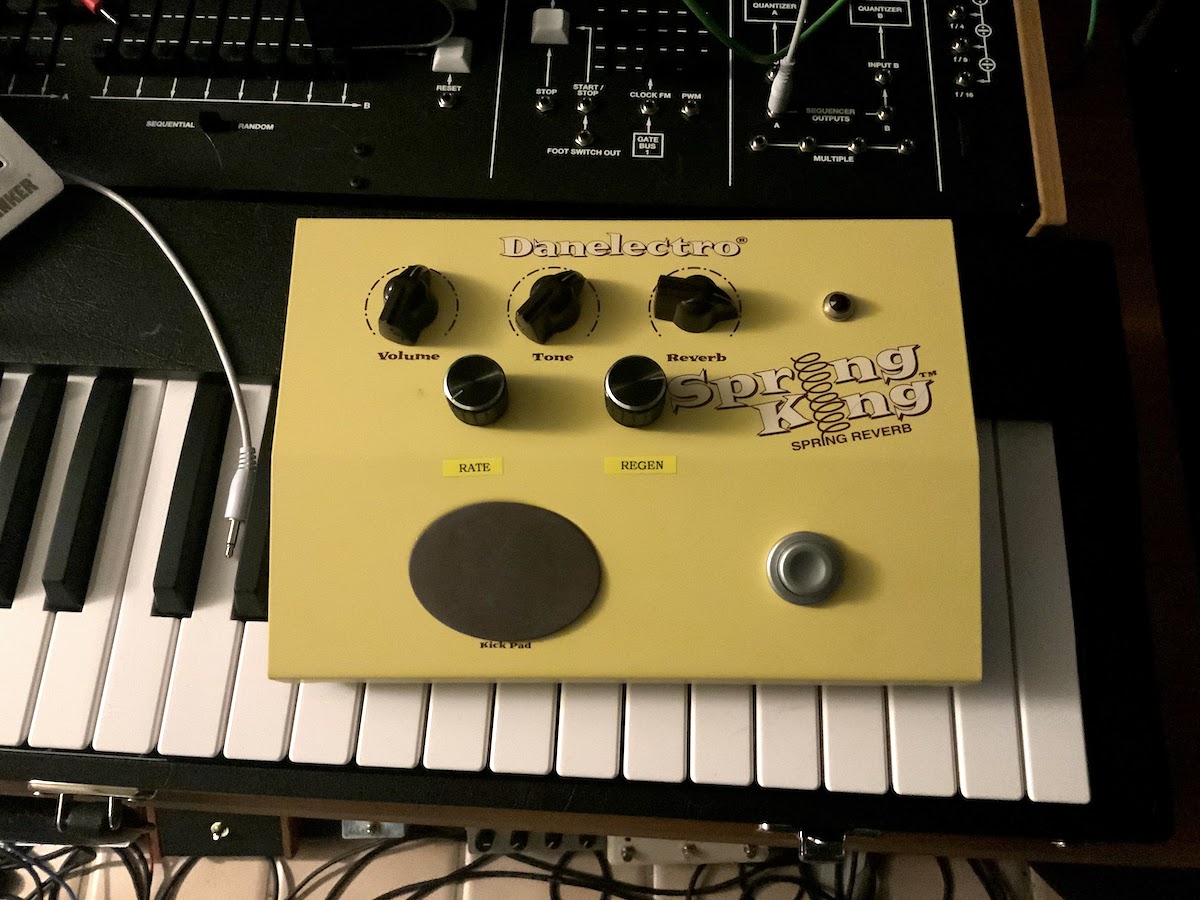
The Spring King is a real spring reverb with a tone control and a delay chip to give it a more pronounced fluttery/slapback sound. There aren't any front panel controls for the delay. Danelectro doesn't even mention that a delay chip is part of this pedals circuit. Resistors are used to set the delay time and feedback amount to fixed values, which are barely noticeable in it's stock configuration. Simply swapping two resistors for pots gives you variable control of the delay, with the 'Reverb' control setting the wet/dry mix for the spring+delay signal. I put a 10k resistor in series with the 50k lin feedback (Regen) pot, so that I could get oscillating feedback and I used a 100r resister in series with the 50k lin delay time (Rate) pot, to prevent the delay chip from locking up when powering the pedal on.
I'll tell you these simple alterations dramatically change the character of the pedal. Now it's great for creating ambient washes and ghostly resonance but you can still get those surf guitar tones it was designed for. The delay chip is a PT2399, so it gets pretty dirty with long delay times and their isn't much headroom but it pairs really nicely with a spring reverb.
-
- Beware the Quoth
- 33144 posts since 4 Sep, 2001 from R'lyeh Oceanic Amusement Park and Funfair
Now I wants one.
my other modular synth is a bugbrand
-
- KVRAF
- 12352 posts since 7 May, 2006 from Southern California
It's a lot of fun. You can easily mod it for an external spring tank and possibly an open feedback loop. I still need to experiment some more. I found this one for $95 new at Sweetwater. They can probably be found for less than that, second hand.
-
- KVRist
- 52 posts since 24 Jan, 2018
Wow sick wtf
-

- KVRist
- 451 posts since 2 Sep, 2012
Synare 3 clone kit from Helensson, mounted on a painted up piece of 2x4. My first steps into DIY.
You do not have the required permissions to view the files attached to this post.