ArcSyn-0 - polysynth built with a Raspberry Pi Zero

...and how to do so...
Post Reply New Topic
RELATED
PRODUCTS

Post

After making my bat detector I decided to try something more ambitious for my next Raspberry Pi project - so I designed and built a 6-voice polyphonic synth, the ArcSyn-0.

Image

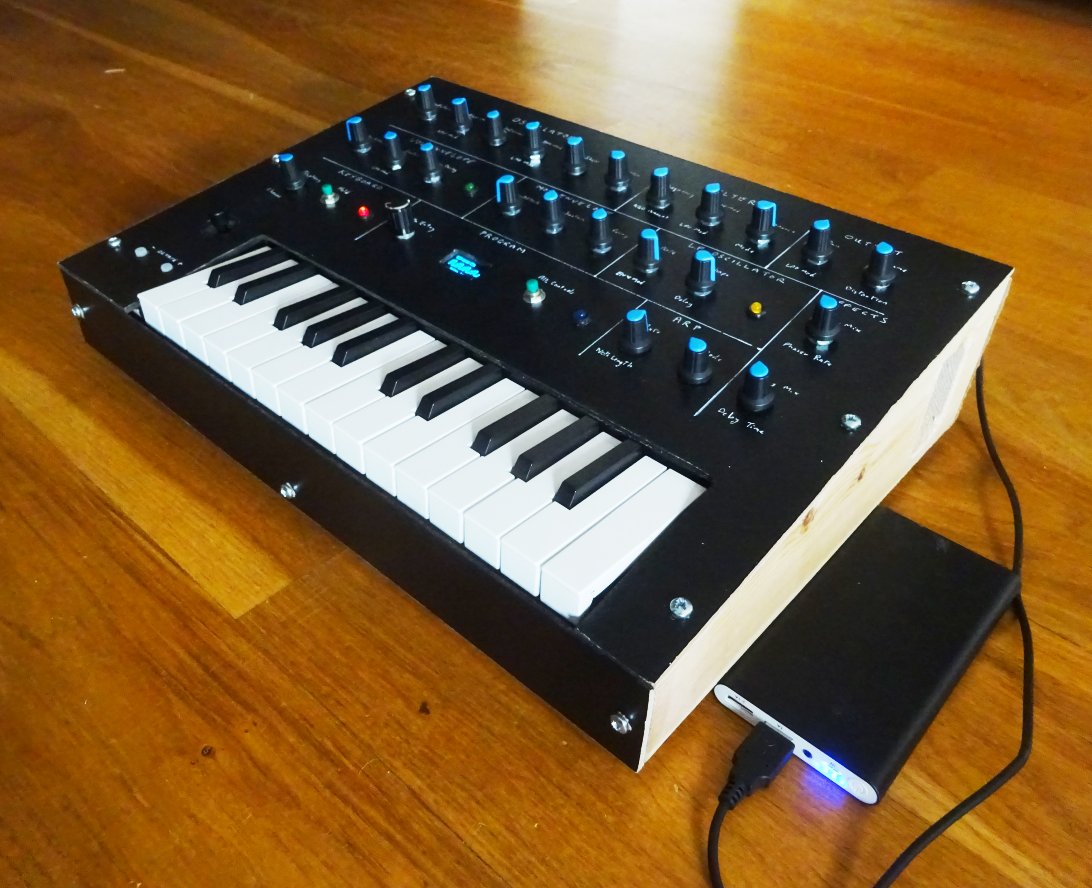
There are dual oscillators plus sub-osc per voice (combine oscillators using mix, hard sync or ring mod), dual loopable envelopes per voice, LP/HP 24dB filter per voice, LFO, arpeggiator, mono/poly/unison mode, stereo delay, phaser, stereo chorus, distortion, oscilloscope waveform display, save/load presets in non-volatile memory. Built-in keyboard, joystick, speakers, serial MIDI input.

It was great fun to design and build, and sounds nice too - IMHO :)

More info on the project here: http://jaggedplanet.com/synthesiser.asp

First couple of recordings:
Sequence1.mp3 - A Berlin-school-inspired piece based around an arpeggiated sequence, consisting of seven tracks recorded and mixed in Audacity. A bit rough around the edges, but it shows some of what the synth can do.

Undulations.mp3 - I used the looping envelope generator as a kind of sequencer, and set it going with 4 notes played at fairly long intervals - then twiddled knobs for 15 minutes! It's a kind of relaxing, hypnotic piece.

Happy days! :)

Post

:hail: Wow! That sounds fantastic!

Very impressive - I wish I had the skills (i.e.patience to learn how) to code.

Do you make your code available? or should we wait for the Behringer clone :lol:

Post

Thanks Knockman - I wish I had your woodworking and UI skills! Out of interest, what do you use for the lettering on your projects, for example your Hougaku Conductor mod?

I don't think the code in my synth is in a fit state for public consumption, so we'd better wait for the clones to materialise :) But if anyone has specific questions about the code then I'd be happy to answer.

Post

I have two methods for lettering - inkjet printer decals which are fiddly but look better if enough care is taken to get them aligned, or printing the whole panel on paper and adhering it to the enclosure - this works best for dark backgrounds and light lettering such as the Hougaku Conductor but you need to take care since the paper can expand, easily tear when using water based glues. I've started using a contact adhesive.
In both cases, I spray them with a matte acrylic lacquer but the decals can react to the lacquer and bleed so it's best to seal them beforehand.
The upshot of all this is making the enclosures takes longer than anything else.

Post

Thanks knockman, that's useful information. I wasn't aware of that inkjet-printable decal paper, I'll have to get myself a few sheets. Definitely agree that making enclosures is a time-consuming business!

Post

Wow, really impressive. Sounds good too.

Re: lettering, you may want to have a look at waterslide transfers too, I know people who use them on DIYguitar pedals with great results. Inkjet or laser varieties.

Post

very nice. will you post eschematics and/or code? thanks

Post

It looks great. Also I like the demo songs.

Post

Very nice. And interesting to find out about Circle.

(and like Autodafe I'd be interested in the schematics too)
my other modular synth is a bugbrand

Post

Nicely done, but ArcSyn-0 (to me) was not the best choice for name. Anyway, I guess this one is not going commercial? Because in that case there is already an ArcSyn (plugin) from SPC Plugins.
i9-10900K | 128GB DDR4 | RTX 3090 | Arturia AudioFuse/KeyLab mkII/SparkLE | PreSonus ATOM/ATOM SQ | Studio One | Reason | Bitwig Studio | Reaper | Renoise | FL Studio | ~900 VSTs | 300+ REs

Post

Thanks for the comments :) I am not going to make this commercial, it was purely for fun and a learning exercise - but it is a shame that the name ArcSyn has already been used. I only discovered that after I had named mine!

Regarding schematics, it was very much made up as I went along so I don't have any - but the peripherals are all pretty standard connections and protocols so it should be fairly clear how to wire them up if you try to make something similar. Experimenting is half the fun anyway :) Likewise, the code is not really in a state where I'd be proud to release it, as it's a bit cobbled-together.

Circle is highly recommended if you are interested in doing this kind of thing, it made it so much easier to get started.

Post Reply

Return to “DIY: Build it and they will come”